Buzzings from a quilter who bumbles her way through life!

Monday, September 30, 2013

Simple "Rag Striped" Throw Pillow Tutorial

 
Do you want a simple project that will use up scraps , make up quickly, and add a punch of color to your decor? How about a throw pillow made of fabric strips sewn to a fabric base? You can use any color you want! You can also make it any size you want!


Start out by cutting a fabric base the size you want your pillow to be.The base will show between the strips after you fringe your raw edges, so use something that will look good with the fabrics you choose. I actually used a lightweight canvas for mine, but quilting cotton works too. You will need 2 pieces - one for the front and one for the back.
It doesn't have to be square. Rectangles work just fine.  Pull out the strips you want from your scrap pile. They can be different widths or the same, whichever you want. Use a glue stick to stick them in place. Glue them all down, sides touching, before you sew. 

After gluing all the strips down, you're ready to sew. 
Sew each strip down 1/4" from each edge. 
 Trim the edges.
 
Place your backing right sides together with the top.
Sew around all sides, leaving an opening in one side for stuffing.
Wash and dry to fringe the raw edges. This will produce a lot of stray threads. You can also choose to use a chenille brush to fringe the edges instead of washing.
Turn right sides out, push out the corners, and press if necessary. If pressing flattens your strips, just dampen them and fluff them up with your fingers.
Stuff with polyester fibers, stuffing corners first and then the remainder of the pillow. Sew the opening closed.
That's it! You're finished! You don't have to use different colors. You can use all one color or alternate between two colors. I used a "jelly roll" and cut the strips into narrower strips.
This can be a lot of fun! I think it could be fun for a grandchild. Hmmm........maybe a future project for a bedroom? 
Until next time....
 

Wait! Did you hear about the $250 giveaway? Go to the Sew and Show button on my sidebar and leave a comment on that post to win!

Friday, September 27, 2013

Fall Color Inspiration in South Texas!


Fall is in the air, and although the trees in south Texas do not give us the show of color seen elsewhere, don't feel too sorry for us! We have gorgeous sunsets! I took this photo from my front yard. The stripes in the sky are not a trick of photography. They were really there in the sky and extended all the way to the horizon behind me.(Colors are different on different monitors, but this sunset was brilliant orange!)

I love to find color inspiration in nature. Can you see these colors used in a quilt? I also try to notice just how much of a color you see in relation to other colors. For example, there is only a small amount of the rich orange in the photo above, but quite a bit of soothing blue and cream. Here is what I pulled from my stash that could be used. I may never even make a quilt form these, but if I did, I think it would be beautiful.


Oops! Sugarplum says, "Wait a minute! There's something on this fabric. Just let me move it!


There! got it!


Look around at all the inspiration outside and see if you can find something to inspire your next color scheme! 


Sunday, September 22, 2013

A Group Quilt for a Good Cause!


I've been "coordinating" the making of a group quilt for a silent auction to be held in about a month. We were asked in August about doing this for the auction in Dallas in November! (Non-quilters don't realize the time that goes into the making of a group quilt.) Many of my quilting friends were gone or busy with school starting, so since the task was given to me, I decided to take one of my patterns and use it for the center of the quilt. I knew this design to be quick to make and easy, so I knew I could get it done in time to pass it along to others. My Little Cowboy quilt pattern has pieces to make your cowboy a girl if you want, so I just made both figures and enlarged the center to fit them. (I also added the purse and lasso.) Don't be afraid to play with your figures and colors!
 
I embroidered a verse around two sides and did a rope-like trapunto on the opposite two sides. Then I asked four others to make the "piano key" borders. Another added the blue border, then I took the quilt to a friend with a long-arm who does beautiful quilting. She volunteered her expertise since this was for a good cause! All that is left is the binding. I have brown left for that.
So....thank you so much to all of you who made this quilt a reality. Louise, Tina, Martha, Holly, and Debbie! It finished off at 54" x 54" before binding.
And a special thank you to Debbie Hayes, who did the quilting. If you are interested in her work, email me with that request and I will pass your name along to her.

Wednesday, September 18, 2013

Giveaway Winners and Loquat Pie!

The Random Number Generator has chosen three winners from my post in the Pin It! Blog Hop. They are Terry at A Quilting Blog, Marjorie of Marjorie's Busy Corner, and Jeanie of Gracie Oliver Arts. Congratulations to them all! I've sent an email to inform them. If you were interested in a pattern, but didn't win, you can find them in my Craftsy Store. I wish everyone could win. Thank you all for playing along.
I thought I would share an unusual recipe today.

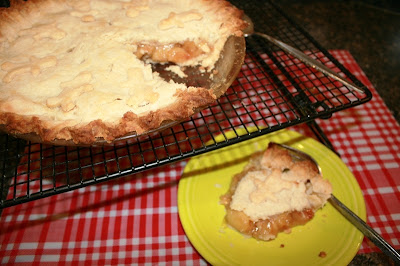
Had to have a bite before I thought to take a picture!
 
I'm just returning from a trip and I'm craving something delicious! I thought I would show you how to make a Loquat Pie. (No, I don't mean Kumquat!)
Some of you may not know what a loquat is. The Loquat is an evergreen shrub that originated in China. It has large leaves and small yellow fruit. You can read about it here The birds love this little tree, by the way! If you don't get the fruit as soon as it ripens, the birds will! The hummingbirds love to hide in its branches and I often see them bathing in the leaves that have caught rain or sprinkler water. This tree blooms in the winter with a wonderful aroma.
hummingbird near the Loquat tree

                                               
I have three loquat trees around my patio. You have seen them many times if you read my blog because I often use them as part of my "prop" in showcasing projects. They are always green, so I love to use them. This year, we had a bumper crop of loquat fruits.The fruit was ripe in April, so I picked them and froze them to use through the year. The taste is a little tart like a MacIntosh Apple, but the texture is more like that of a peach. (You could use this recipe for peach pie if you don't have access to loquats.)
I decided to make a pie.
 I thawed about 4 cups of loquats.
Added a teaspoon of lemon juice....
 1/4 cup of sugar (you could add more or less to taste, I like it tart)...
and 1 1/2 tablespoons of Minute Tapioca (the dry kind - not the ready made pudding!) I use this for all my fruit pies. I much prefer it to flour for thickening my pies.
Pour the fruit into your prepared pie shell (uncooked). (I use an oil based crust instead of one made of shortening, but you can use one of your choice....even purchased.) I dotted the top with butter. (Most of the time,  I just melt a little butter and add it to the fruit! I forgot this time!)
I used the dough left after trimming to cut out little "gingerbread" men to dance around the outer edge. Don't forget to make a few slits to allow the steam to escape. Bake at 425 for about 40 minutes. (This may be different for your pie crust, so use what you might use for a fruit pie.)
YUMMY! I couldn't wait and ended up eating the tip off the pie before I got a photo! Oh, well. 
If you live where loquats can grow (I'm in south Texas) you might consider getting one...or two...or three! They're delicious in a smoothie, too!  I just peeled and seeded  them and plopped them in a freezer bag. I plan on using them up before Christmas, so I'm not sure how long they will last frozen without any type of preservative. I put them up in April and they are fine so far!)


Thursday, September 12, 2013

Pin It! - My Day at the Spa! (or at the Hop!)


Do you ever ache after a day of sewing or quilting? Have that pins and needles pain in your joints? Come on in and relax! Pour up a bubble bath, a cup of coffee or tea, and soft music! .....Ahhhhhh...now, that's nice! 

..or, if you're not the soft music, luxury type,....kick off your boots and climb in the old tub! (Just be sure you're the FIRST one in! Being last means cold, dirty water!) Since I live in an area with REAL cowboys around, I had fun with this one!
Oops! He's dropped his soap!
Both of these are pin cushions. I used felt, pom poms, and a few embellishments like beads. The first one has a "girl" attached that I made from polymer clay. They both function quite well! The little galvanized tub was purchased over the internet just for this. It is 4" long.)


If I had not been unexpectedly called away, I would have worked some more on the details of this little cowboy, for as with most first tries, there is tweaking to do. I plan on trying again when I return to see if I can make him even better! You can see that he is wearing a little cowboy hat!
I do have a giveaway!(Giveaway is now closed.) I will choose (by random number generator) a winner from the comments on this post. I will choose three winners! I have three pin cushion patterns available on Craftsy. I will give away a PDF copy of one to each of three winners. Just tell me which you like best in your comment!
Easy Elephant Pin Cushion by L. Winters, image 5
Easy Elephant
Miss Bumble Pin Cushion
Miss Bumble
Easy Handbag Pin Cushion
Handbag


After hopping through all the blogs participating this morning, maybe you can have a bubble bath of your own!
Many thanks to  Mdm. Samm of Sew We Quilt and Kristen or Meadowbrook for hosting this blog hop!
 Here are the other bloggers today:


     Now I'm off to do a little relaxing of my own! (Actually, I've been called away to California to babysit and we will be attending a very important Naval (military) -not navel(belly button)- ceremony today. If I'm slow to respond to you, please know I will catch up as soon as I can!)


Tuesday, September 10, 2013

Pin It Blog Hop Sneak Peak!

                                     
In case you are unaware, there is a blog hop starting today where you will get tons of ideas for adorable pin cushions! My day is Friday the 13th! (Good thing I'm not superstitious!)
I will be showing two pin cushions that I think you might find amusing. Here is a sneak peak at them.

 I know, it's really hard to tell what this is, but that's the idea! I want you to come back and see it revealed!


The same is true of this one. I don't want to give it away...

...or did I? Do you know what these are?
Be sure to check back on Friday, September 13 to see them! I have a giveaway, too, with three winners! 
In the meantime, be sure to check here to see each day's schedule and the top picks for the day!
 
See you Friday!
 

Thursday, September 5, 2013

Just How Hard is Freezer Paper Applique?

"There Was an Old Lady Who Swallowed a Fly"

Some of you have expressed concern that applique looks too complicated. I think you would be surprised at just how easy it can be. There are methods that are more complicated than others, but after trying them all when I first started, this is the method I settled on. I use a freezer paper method where the freezer paper is ironed to the RIGHT side of the fabric and the seam allowance is turned to the back using a glue stick.
There are several reasons I love this method:
  •  First, it is simple. This is something a beginner can do. Really!I've taught this as a class and the most common comment I hear is, "Oh, this is so much easier than the way I've been doing it! I can do this!"
    Large figures make for really easy applique!
  •  Second, what you see is what you get. Your edges are turned under and ready to sew before you even lay the pieces out on your background. That means you can see exactly what it will look like. You can change colors or fabrics at this point if you are not pleased with what you see, you haven't invested a lot of time in it yet.
  • Since your edges are turned under and ready, you can concentrate on your stitches.
  • Since the freezer paper is ironed to the FRONT of the fabric, you don't have to disturb your seams when you remove it.
  • You are not committed to hand applique. You can easily sew the pieces down by machine, but you have no raw edges. This means your applique will hold up to some real use.
    Tropical quilt with appliqued flowers for my granddaughter's room
  • You do not need to reverse your images when you trace them off. You trace it exactly as it will look when you finish.

    If you are interested in seeing a detailed tutorial of this method, go here. I also have some previous posts that you might find helpful for applique: (just click on the subject you are interested in)


 Finding the Right Background for Applique
Related Posts Plugin for WordPress, Blogger...